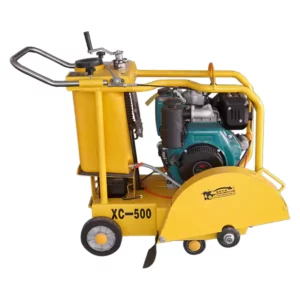
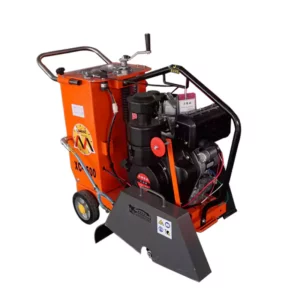
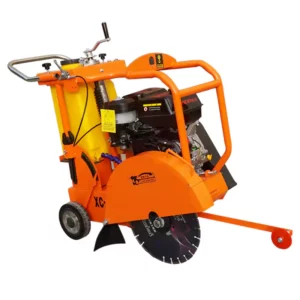
1. ASSEMBLING INSTRUCTIONS OF ROAD CUTTER
UNPACKING
- Remove the road cutterand all components from its shipping crate. You will see:
Preassembled Saw with no Blade, unless diamond blade was purchased separately.
If asked, you will find saws in double stack and handles attached separately.
Note: All installation hardware must be inserted into its respective location on the road cutter, see parts explosion for more details.
- If saw is shipped doublestacked, using appropriated equipment, hold the upper saw from the frame, unbolt the upper saw from the supports, and bring the road cutter to the ground and then proceed to bring the lower saw to the ground, using the same appropriated
Warning: failure to use proper lifting equipment could cause saw to fall and cause serious injury.
- If saw is shipped regular,using appropriated equipment, bring the road cutter to the ground from its shipping
- Install the road cutter, into the walk behind style, and proceed to bolt and torque to 60lbs.
- Bring the road cutterup using t he crank lift and lock at the desired position and lock

ARBOR OR ENGINE SHEAVE INSTALLATION/REMOVAL OF ROAD CUTTER
- Standard sheaves on this saw are of the QD design. To remove sheave, remove belt guard and remove
- Removehex head cap screws from sheave
- Installcaps screws in tapped holes in sheave bushing.
- Tighten caps screw alternately and equally until sheaves loosens from bushing.
- Loosen set screw over keyway in bushing and remove sheave/bushing.
- Wipe all parts clean be fore assembly. A light coat of grease can be applied to engine shaft or arbor shaft. Do not place lubricants on tapered bore of sheaves, tapered hub of Q.D. bushing or bolt
- To install sheaves, line u p drilled holes in bushing with tapped holes in sheaves and install cap
- Align bushing on arbor s haft with bushing on engine shaft and tighten set screw overkey
- Tighten cap screws alternately and equally to 10 lbs. Oftorque and inspect alignment.
- Verify sheave alignment with a straight edge to reach between the two sheaves. The sheaves should be aligned with each other towithin 1/32”.
- Readjust sheave on arbor shaft as required to achieve alignment of within 1/32”.
- When sheaves are aligned properly, install and pretension
BLADE INSTALLATION/REMOVAL OF ROAD CUTTER
IF BLADE GUARD IS TO BE REMOVED TO SERVICE BLADE, IT MUST BE REPLACED BEFORE RUNNING SAW. NEVER RUN SAW WITHOUT BLADE GUARD INSTALLED!
- Turn lift/lower crank to raise saw. Lock crank in place with locking
- Disconnect Spark plug w
- Remove arbor bolt, lock washer, and outside blade collar with
- Clean and inspect arbor , blade, collars andbolts
- Verify inside blade collar is fully engaged on arbor and key is positioned properly. NOTE: Saw uses 4” diameterscollars.
- Mount blade over shoulder of outside collar. Pin must engage 3/8” diameter hole in Many diamonds blades will have directional arrow onblade.
- ReInstall outside blade collar and blade onto arbor shaft with 1” diameter shoulder and 3/8” pin engaging inside collar. Install bolt and torque at 60 lbs.
- Be sure that blade is installed to rotate in correct direction and that the saw isset up for required
- Wet cutting diamonds b lades must be used with water. Turn water on BEFORE STARTING

2. SAFETY PRECAUTIONS
READ AND STUDY THE FOLLOWING SAFETY INFORMATION BEFORE ATTEMPTING TO OPERATE THIS EQUIPMENT. IN ADDITION, ENSURE THAT EVERY INDIVIDUAL WHO OPERATES OR WORKS WITH THIS EQUIPMENT IS FAMILIAR WITH THESE SAFETY PRECAUTIONS.
WARNING LETHAL EXHAUST GAS!
An internal combustion engine discharges carbon monoxide, which is a poisonous and odorless invisible gas. Death or serious illness may result if inhaled. Operate only in an area with good ventilation, NEVER IN A CONFINED AREA!
WARNING DANGEROUS FUELS!
Use extreme caution when storing, handling and using fuels they are highly volatile and explosive in the vapor state. Do not add fuel while engine is running. Stop and cool the engine before adding fuel. DO NOT SMOKE WHEN REFUELING!
SAFETY GUARDS
It is the owner’s responsibility to ensure ALL GUARDS AND SHIELDS are in place and in working order.
IGNITION SYSTEMS
Breakerless magneto and batteries ignition systems CAN CAUSE SEVERE ELECTRICAL SHOCKS, avoid contact with these components or their wiring.
SAFE DRESS
DO NOT WEAR loose clothing, rings, wristwatches, etc., near machinery.
NOISE PROTECTION
Wear O.S.H.A. specified hearing protection devices.
FOOT PROTECTION
Wear O.S.H.A. specified steel tip safety shoes.
HEAD PROTECTION
Wear O.S.H.A. specified safety helmets.
EYE PROTECTION
Wear O.S.H.A. specified eyes shields, safety glasses, and sweat bands.
DUST PROTECTION
Wear O.S.H.A. specified dust mask or respirator.
OPERATOR
Keep children and bystanders off and away from the road cutter. Only trained Operators who fully understand its safety operation may use this equipment.
OPERATOR
For details on safety rules and regulations in the United States, contact your local Occupational Safety and Health Administration (O.S.H.A.) office. Equipment operated in other countries must be operated and serviced in accordance and compliance with any and all safety requirements of such country. The publication of these safety precautions is done for your information does not by the publication of these precautions, imply or in any way represent that these are the sum of all dangers present near equipment. If you are operating a unit it is your responsibility to ensure that such operation is in full accordance with all applicable safety requirements and codes. All requirements of the United States Federal Occupational Safety and Health Administration Act must be met when operated in areas that are under the jurisdiction of that United States Department.

3. BEFORE OPERATING OF ROAD CUTTER
- REMEMBER! It is the owner´s responsibility to communicate information on the safe use and proper operation of this unit to the
- Before operating, review SAFETY PRECAUTIONS listed on page 6 of this
- Familiarize yourself with the operation of the unit and confirm that all controls function properly BEFORE starting
- Locate the kill switch an d assure you know how to STOP the
- Make sure hands, feet, and clothing are at a safe distance from any moveable parts prior to
- Shrouds and guards are provided to protect the operator or structures in close proximity to rotating hot engine parts. It is the RESPONSABILITY OF THE OPERATOR to see that they are properly in place. NEVER operate this equipment without a guard. The flip half of the guard may be raised only when cutting curb/wall.
- OIL LEVEL Check the oil level in the For more information see “Lubrication” under the engine “Owner’s Manual” the “Maintenance” section of this manual. All saws come without oil. Running an engine without lubrication may damage the engine.
- AIR CLEANER Check to ensure elements are in good condition and properly
- Review every decal with the OPERATOR.
- FUEL SUPPLY Engines o n Saw equipment require an automotive grade of clean, fresh, unleaded or regular gasoline. All saws come without gasoline and oil.
- FUEL FILTER Check to ensure element is in good condition. Replace if it is clogged or
- LUBRICATION POINTS – Grease wheels, arbor shaft bearings
- POSITION – The only operating position for this saw is between the handle bars at the rear of the road cutter. If the operator must leave this position the engine must be shut
- SPECTATORS – Keep all personnel/spectators away from saw while cutting. Spinning diamonds blades can throw segments;
4. STARTING ENGINE OF ROAD CUTTER
GAS ENGINE
- With the road cutterengine level with the ground check oil level and add oil and fuel as required.
- Ensure the stop switch on the unit is in the “Out”
- Prior to starting engine, make sure saw is raised using the manual crank lift and so the diamond blade is clear of any ground
- Engage the crank lock handle.
- Move the engine throttle control to the “FAST”
- Choke the engine if necessary. (You may not need to choke a warmengine)
BEFORE STARTING ENGINE MAKE SURE ALL GUARDS ARE IN PLACE.
- Pull the starter Rope until you feel
- Reset the recoil, and the pull with a brisk, firm
- After the engine starts, move the choke lever to the open position, move the throttle level to the “IDLE” position and let the engine warmup for one or two
SLOWLY LOWER BLADE INTO CUT. IT IS RECOMMENDED THAT SAW CUTS BE MADE BY NO MORE THAN 2” TO 3” INCREMENTS AT A TIME. GREATER DEPTHS OF CUT MAY DAMAGE THE BLADE.
- To stop the engine, make sure to let the engine idle before stopping by using the crank lift handle to raise the road cutter
- Push in the engine stop switch on the road cutter.
- Close the fuel
ELECTRIC MOTOR
- Plug themotor into a suitable power
- Move the switch on the motor to the “ON”
- It is recommended to let the motor idle before running and stopping by using the crank lift handle to raise the road cutter
STOP THE ENGINE OR ELECTRIC MOTOR BEFORE:
- Adding
- Leaving equipment unattended for any amount of time.
- Making any repairs or adjustments to the unit.
- Lifting/Transportation.
5. OPERATION INSTRUCTIONS OF ROAD CUTTER
OPERATING
- After turning engine/mo tor “ON”.
- Lower saw blade until i t just touches the pavement by turning the manual lift crank clockwise.
- From this point, each ¼ turn of the lift/lower crank equals ¼” depth of
- Down the road cuttercutter guide.
- Slowly push saw forward to desired cutting
- Cut only in straight
DO NOT OPERATE THE UNIT WITH THE BLADE GUARD OPEN/DETACHED!
IF ADDITIONAL CUTS ARE TO BE MADE, TURN WATER VALVE “OFF”, TURN ENGINE “OFF”AND MOVE SAW TO NEXT CUTTING AREA.
6. SERVICE INSTRUCTIONS ROAD CUTTER
Never service or lubricate the unit engine while running.
After servicing the unit , restore and fasten all guards, shields, and covers to their original positions.
Never drain oil into the ground, into open streams, or down sewage drains.
WHEN LIFTING/LOWERING A SAW ALWAYS:
- Leave lift/lower crank handle in locked
- Stop the engine or electricmotor of road cutter.
- REMOVE ALL BLADES (leave blade arbor, guards inplace
- Lift the road cutterguide to avoid any contact with the
- Secure any other hardware on the road cutter.
- Make sure you use appropriated lifting equipment rated to lift the road cutter. Have in mind the road cutter
- Do not position yours elf where you could possibly be pinched or caught between saw and some other
TOWING
- Move saw on the jobsite by hand pushing. Do not tow the road cutterwith another vehicle. the road cuttermay be damage if towed.
CUTTING
- Make sure you know what you are sawing before making any cuts. Be aware of all utilities i.e. gas lines, electricity, etc. take necessary precautions to prevent injury/death.
STORING
- Drain fuel
- Remove blade, collar, an d arbor nuts from both ends of
- Clean arbor shaft, threads, blade collars and arbor nuts. Coat parts with
- Lube allbearings
- Empty watersystem
- Clean all moving parts with WD40
- Lower saw
- Cover saw for protection.
ENGINE
See engine owner´s manual maintenance schedule. ARBOR SET UP
- Set each beltarbor tension for 1/4” deflection with a 6 lbs. load in middle of belt span. Over tension or under tensioning belts will cause premature belt failure.
- To adjust belt tension, loosen hex nut or belt tension bolt (twoplaces).
- To increase belt tension , turn tension bolts
- To decrease belt tension, turn tension bolts counter
After adjusting belts, make sure engine mount is level to saw frame. Secure position of tension bolts by tightening hex nut (two places).
- When replacing arbor s haft or pillow block bearings, always adjust bearings so arbor shaft runs PARALELL to rear axle. Torquebearings bolts to 60 ft. lbs.
CLEAN AND INSPECT BLADE COLLARS EACH TIME BLADE IS INSTALLED. REPLACE DAMAGED PARTS. TO REPLACE BLADE PIN, USE ARBOR PRESS DO NOT USE A HAMMER.
LUBRICATION
- Grease wheels , arbor shaft bearings daily. Use high quality
- Check water system for cleaning. 2 to 5 gallons per minute is required to for wet cutting. Use ¾” ID hose to feed water to
BLADE
- Clean blade collars before installing new blade; inspect all blades before installing on saw. Ring test abrasive blades to make sure they are free from cracks;do not use abrasive blades that have been damaged e. missing blotters
cracked or missing sections. Inspect diamond blades to make sure they don’t have missing segments or stress cracks.
- Use only blades rates t o operate at proper arbor speed (3000 RPM). Use only proper size blade guards on your
SAW ROCK ADJUSTMENT
- Place saw on flat surface.
- Locate set screw/jam nu t over right end of rear
- Loosen jam
- Turn Bolt clockwise to re move saw rock on right front and left rear
- Turn Bolt counter clock wise to remove saw rock on left front and right rear wheels.
- Hold Bolt in desired position and tighten jam
7. WARRANTY OF ROAD CUTTER
THIS IS YOUR WARRANTY – PLEAE READ AND SAVE
Each new machine is warrantied against any manufacturing defect in material and workmanship under normal use and service for a period of (1) one year. Warranty period begins on first day of use.
- The obligation under this warranty is limited to the road cutterof parts at your factory branch or on an authorized
- Machinesaltered or modified without written consent may void this warranty policy Misuse, negligence, accidents or the operation of road cutters in any other way that the recommended by operation procedures, will void this warranty policy. This warranty shall not apply to machines repaired by other than authorized branches or distributors.
- The cost of transportation and other expenses related are not covered bythis warranty.
- Writtenauthorization for the return of merchandise under warranty must be obtain from customer service contact. All equipment & parts returned may be sent with a signed RGA (Return Goods Authorization) for its follow up.
- TheFactory reserves the right to inspect and render the final decision on each warranty
- The Factory reserves the right to improve or make product changes without incurring any obligation to update, refit or install on machines previously
- The Factory is not responsible for any liability, damage or injury directly or indirectly from the design, material or operation of its
- Warranty request must be submitted in written within 30 days after machine failure to TheFactory
customer service.
THE WARRANTY IS EXPRESSLY IN LIEU OF ALL OTHER WARRANTIES, EXPRESSED OR IMPLIED, INCLUDING THE WARRANTIES OF MERCHANT ABILITY AND FITNESS FOR USE AND OF ALL OTHER OBLIGATION OR LIABILITIES ON OUR PART. MOTOR AND THEIR COMPONENTS ARE COVERED BY THE ENGINE MANUFACTURE


